Sunday, April 25, 2021

Sandbox Vs Production Instance in D365

While working with D365 we have to deal with different instances of the organizations or we can say we have different environments while development and testing and there is different type of instance when we put it on production-

Basically there are two type of instance available in D365-

1. Production Instance 

2. Sandbox Instance

Lets discuss about both the instances in brief here-

Production Instance :

An Instance of type ‘Production’ is considered as your LIVE environment which was made available to your end users.

You cannot perform some admin actions on your Production instances.

For example, you cannot reset the instance and you cannot copy an instance to another Production instance.

You cannot set ‘Admin Mode’ on your production instances.

If you subscribe CRM 30 days trail, you will get ‘Production’ instance by default. You can change the ‘Instance Type’ to ‘Sandbox’ by using ‘Edit’ option.

Sandbox Instance:

A Sandbox instance is the place to safely develop and test your application changes with low risk.

A Sandbox instance type can be your test instance or UAT.

As an example, you can Reset (i.e., Becomes Vanilla)/Copy/Delete your sandbox instance.

In ‘Sandbox’, its easy to replicate your Production instance by using ‘Copy’ feature.

You can set ‘Admin Mode’.

Managed Vs Unmanaged solutions Dynamics 365

First of all lets understand what is the Solution

In Dynamics 365 solutions are leveraged to transport apps and components from one organization to another or to apply a set of customizations to existing apps. 

A solution can contain one or more apps as well as other components such as site maps, entities, processes, web resources, option sets, and more. 

So basically a solution is a file that you can import in to an environment as an app or to apply a set of customizations to an existing app.

Now lets understand what is Managed and Unmanaged Solution-

Managed Solutions
Managed solutions can modify the system solution components and add new components. If multiple managed solutions are installed, the first one installed is below the managed solution installed later. This means that the second solution installed can customize the one installed before it. When two managed solutions have conflicting definitions, the general rule is “Last one wins." If you uninstall a managed solution, the managed solution below it takes effect. If you uninstall all managed solution, the default behavior defined within the system solution is applied.

Unmanaged Solutions

When you import an unmanaged solution, you add all the components of that solution into your default solution. You can’t delete the components by uninstalling the solution.

When you import an unmanaged solution that contains solution components that you have already customized, your customizations will be overwritten by the customizations in the unmanaged solution. You can’t undo this

Even if you don’t plan on distributing your solution, you might want to create and use an unmanaged solution to have a separate view that only includes those parts of the application that you have customized. Whenever you customize something, just add it to the unmanaged solution that you created.

Saturday, April 24, 2021

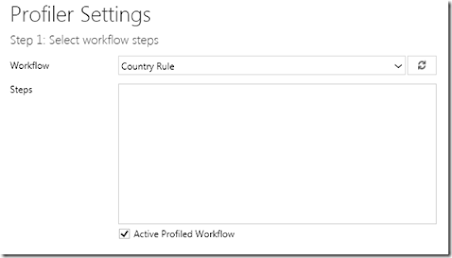
Workflow not appearing in Workflow Profiler in Plugin Registration Tool

Recently I was trying to debug the Custom Workflow Activity to rectify the logical errors, but when I was trying to select my workflow in drop down list of profiler in which I have use my custom Activity, and is was not listed there. I thought may be my workflow is not active in this case but I found that activated when I checked it.


When I tried to search the cause for why the workflow is not appearing in profile of plugin registration tool and found that - 

Make sure the user with whom you have logged in to Plugin Registration Tool and the the owner of the workflow, should be the same person. Otherwise the workflow won’t simply appear in the ‘Profile Workflow’ list.


Wednesday, December 19, 2018

Portal for MS CRM 365 On-Premise


Currently we are working with MS CRM 365 On-Premise and there is a requirement came from the client to develop a portal for the Customer as well as Vendors. We have heard about the MS CRM 365 Portal option which we can enable and design portal as per the requirement.

As we are using On-Premise we knew that we can have option of Adx-Portal where we would require the valid license, although tried to search and found that Microsoft release the Microsoft Dynamics 365 Customer Engagement Portals Source Code, the download contains the self-hosted Portals which are available for Dynamics 365 On-Premise. This will allow you to customize the portals per your requirements and deploy then to Dynamics 365 (On-Premise) as well as Dynamics 365 (Online).

The portals are compatible with the Online and On-Premise version 8.1 and later. The important thing to note is that this source code is provided to customers that are unable to deploy portals in an online environment, and are willing to maintain the portals code internally. Microsoft is not planning on supporting this code, which is also why it is provided under the open source license, and at the point of writing this, there are not acknowledgements of whether or not this will be supported in the future.

The download contains the solution files, the source code and the deployment instructions of the source code. The integration with the Portals web application can be implemented using an internal/organizational IIS server or using Microsoft Azure.

You can download the portals from the following link:

You can configure the Portal for your organization with the help of deployment instructions document provided and use the open source portal. 


Hope this information will helpful.


Monday, September 17, 2018

Change Field Color in MS CRM 365


We recently upgraded one of our MS CRM 2011 application to MS CRM 365 and did found that whatever script we have written to change the field color it’s not working.

The reason behind this is we have switched off Legacy Rendering off and the forms are getting render using the new Turbo Form Rendering engine.

Here is the simple workaround we did found to field color change to be working-

1. First of all get the field element using parent.document.getElementById() method because document.getElementById() does not work here with new rendering engine.

    var scandoc = parent.document.getElementById("scanneddocumentpath");

After getting the field element object successfully set the zeroth element style properties as shown below-

   scandoc.children[0].style.color = 'blue';
   scandoc.children[0].style.textDecoration = "underline";


Here zeroth element is nothing but a "ms-crm-Inline-Value" css class applied to your text box and we are setting just a property of it using the above method.

That's it, it will change the color of your text field and you don't need to enable Legacy Rendering option.


Expected out of the field look like as shown in below screenshot of the form-


Friday, September 14, 2018

If multiple plug ins are registered with same execution order for same entity in which order they will get execute?


While registering the plug in we have to provide the execution order if multiple plugins are register for the same entity, what happens when the there are multiple plugins are registered for particular entity and the execution order is 1 for all of them? 

Well this is the information I found with Microsoft documentation of plug in- 


Specifies the order, also known as rank, that plug-ins are executed within a pipeline stage. Plug-ins registered with an order value of 1 are executed first, followed by plug-ins registered with an order of 2, and so on. However, if there is more than one plug-in in a stage with the same order value, then the plug-in with the earliest compilation date is called first.

Reference: 

https://docs.microsoft.com/en-us/previous-versions/dynamics-crm2011/developer-articles/hh237515(v=crm.6)#bkmk_RegStep


Thursday, September 13, 2018

Multi-Select Option Set in MS CRM


Finally, Microsoft has introduced a most awaited feature in Dynamics CRM 365 (Version 9) which provides ability to user to select multiple options from the drop down i.e. Multi-select Option Set.

While working with these type of requirement in previous versions of the MS CRM we have to achieve using customization. But now it is the part of out of the box functionalities.

Below are few points about the Multi Select OptionSets-
  • Multi-select Option Sets are a new attribute type
  • They are available on the Unified Interface as well as the Web Client
  • They are available for Main Forms, Quick Create Forms, and Quick View Forms.
  • They are not supported on legacy forms (i.e. mobile form)
  • They support all client APIs such as set attributes and controls, and will return an array instead of a single value.
So let’s understand here how we can use Multi select option in new version-
  1. Open your Form Designer
  2. Create a New Field
  3.  Provide the required details like Display Name and Name of the field as well as Field Requirement.
  4. Now to make it Multi Select, select the Data Type as “Multi Select Option Set
  5. Then add the appropriate options with proper label in the Option area as shown in below screen shot, here I have added options as provided document type like, Driving License, Phone bill etc. After filling all information click on Save and Close. 


Add the respective field on your form and that’s it, now you will able be able to use the Multi select Option set field , see below picture where I have selected multiple value from the drop down.


You can also add the column in a system view and it will show the values in view as shown in below format-


With the below URL you can find the more information like how we can deal pro-grammatically with the Multi-Select Option Set-


QueryExpression vs. FetchXML in MS CRM with C#

Microsoft Dynamics CRM (Customer Relationship Management) is a powerful platform that helps organizations streamline their business processe...